Here in the Gygi Kitchen we decided it was time again for another pan showdown (reminiscent of our Cake Pan Showdown). And because it is inching closer into fall, we decided that this time we wanted to test out some different bread pans. They come in so many different sizes and materials. But ultimately, what everyone wants to know is, which one is the best at baking bread? Well, after a full day in the test kitchen we are here to reveal the results. And honestly, we were kind of surprised, and think you will be too. This is the moment you have all been waiting for!
Based on our research and what we already knew about bread pans, we wanted to do a quick test with just three different types of bread pans: aluminum, silicone, and ceramic. We figured this would give us a good set of parameters so we would know exactly what we were looking at and we could decide if we wanted to go more in depth with the testing. The recipe we used for this initial pass was a basic white bread (and we tossed in a handful of cinnamon chips for good measure). The recipe was meant for three loaves, so that was actually perfect for us.
Time for Testing
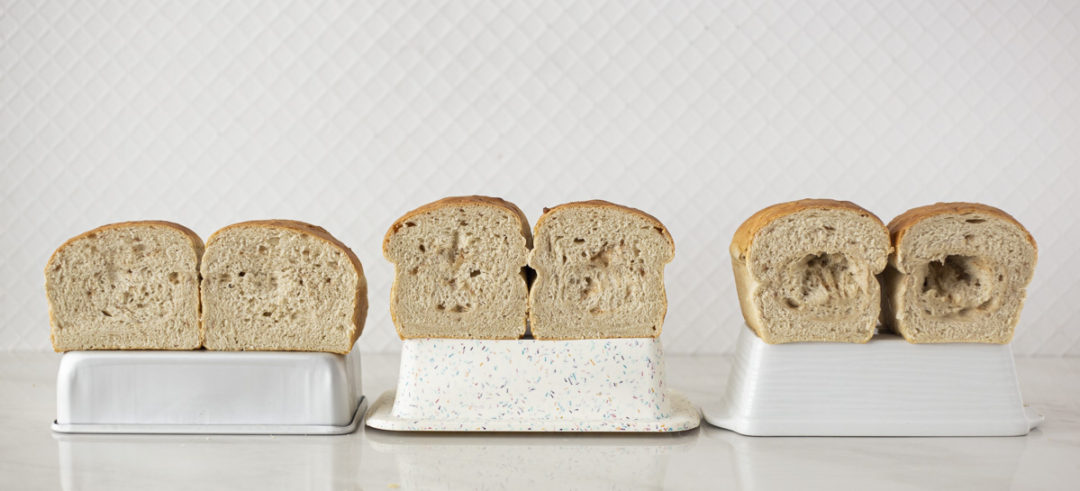
For our controls in this showdown we selected three different bread pans that were all approximately the same size and capacity (turns out getting the exact same dimensions and capacity across the board was impossible, so we did our best). We mixed up one full batch of dough in the Ankarsrum Mixer and let the dough rise for the designated amount of time. Then we punched it down and weighed out the sections so that each pan had the exact same amount of dough. We prepped the pans all the same, with just a little bit of shortening and flour. We formed the loaves and let them all rise again, just on the counter at room temperature. Then we transferred them all to the same oven, rotating them every few minutes for the most even bake possible. And, knowing full well it would produce different results, we cooked them all the exact same amount of time as outlined by the recipe (25 minutes, no more, no less). When they were done we pulled them all out and let them cool for the same amount of time before removing them from the pan. With these controls in place, we were very excited to see where this preliminary testing would lead. Ready for the results? Here we go!
Anodized Aluminum Bread Pan
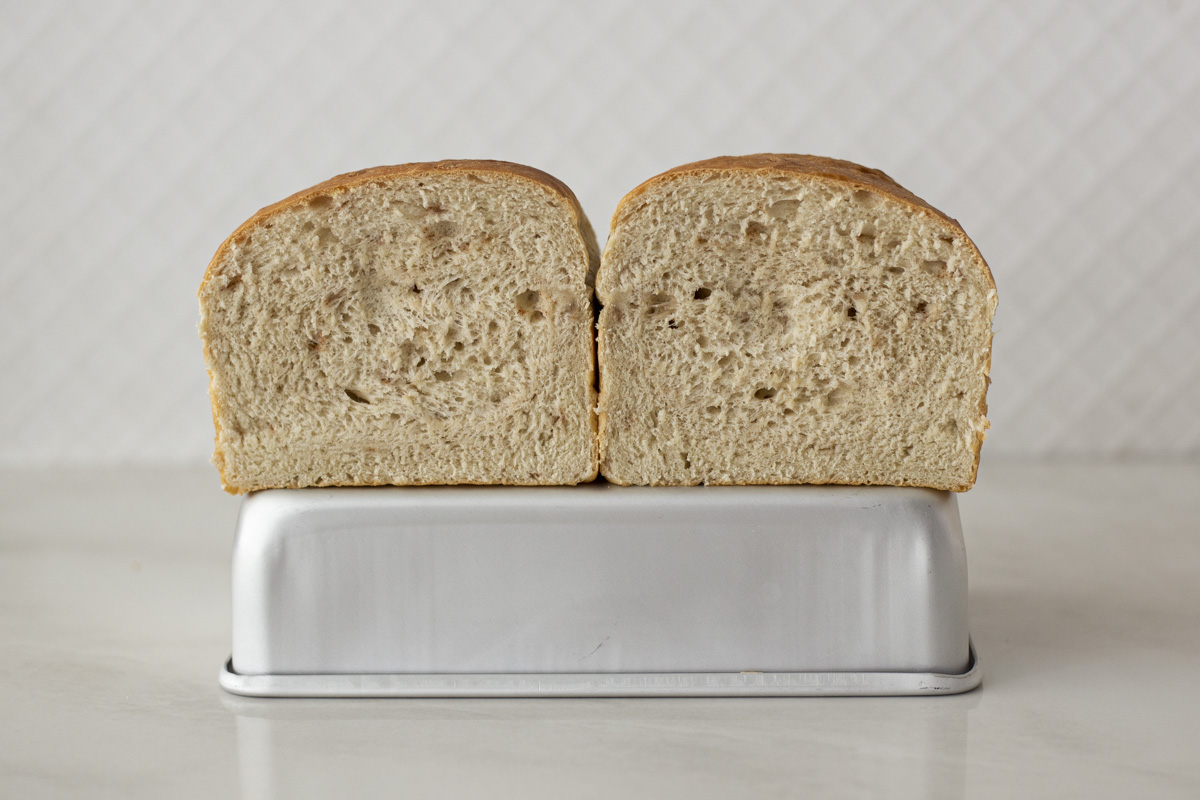
Our first pan was the tried and true Fat Daddio’s anodized aluminum bread pan in a 9” x 5” x 2 ½” and a 52 oz. capacity (this was our biggest pan as far as dimensions and capacity goes!). From our research we knew the metal pan would warm up faster and cool down faster than the other materials. The resulting loaf was definitely wider and shorter than the other pans (looking less like a sandwich bread), but the crust had good browning on all sides. And when we cut into this loaf, we found it did have a more uniform and consistent bake throughout, but the inside was still a little tacky. It needed a just a couple more minutes in the oven. All in all, we thought this might cook up the best and were pleased that the result reflected that hypothesis.
Silicone Bread Pan
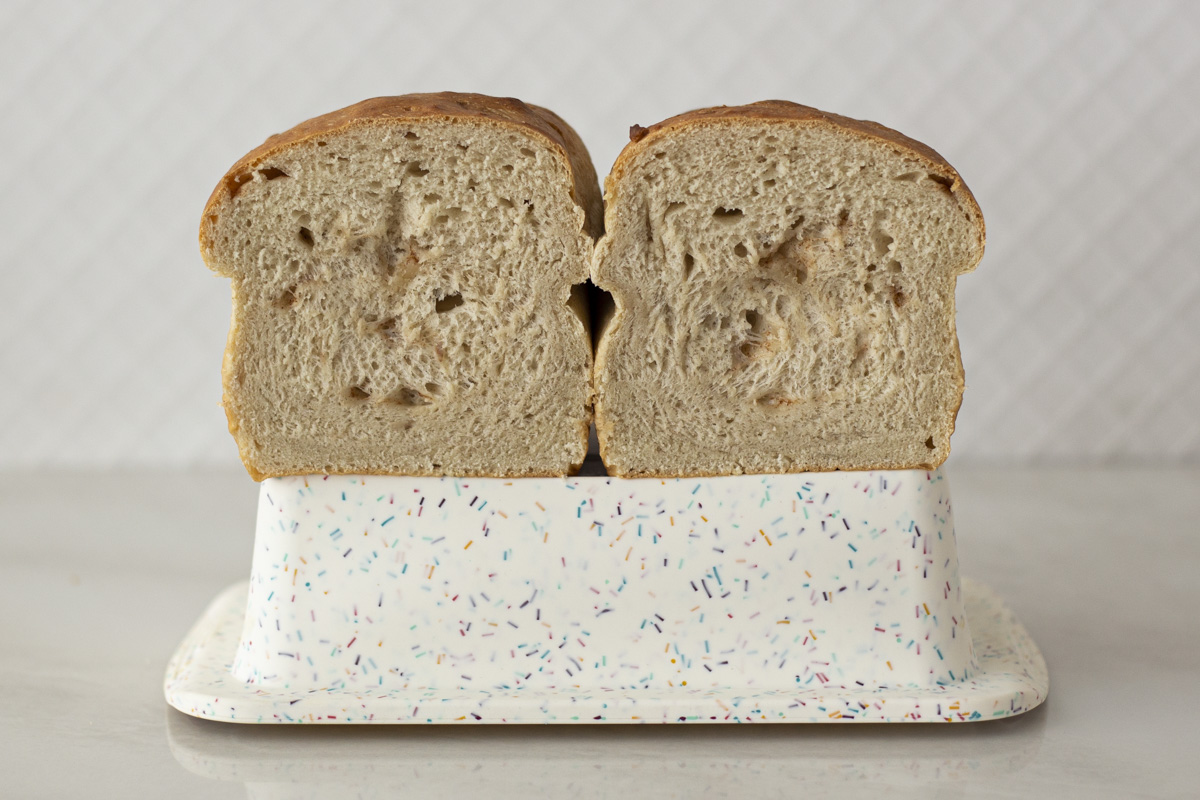
The silicone pan really surprised us! This is the Confetti silicone loaf pan in a 8 ½” x 4 ½” x 2 ¾” with a 48 oz. capacity. This pan is more insulating, so it doesn’t heat up and cool down as quickly as the other materials. But still, the resulting loaf puffed up so big during the second rise that it almost started to collapse before we got it in the oven. This might have been due to the fact that the bottom of the pan didn’t have as much structure to hold the shape when we moved it. But it still baked up nice and tall. We thought when this came out of the oven, that it would have lighter sides and edges, but they all had good color and a decent structure to them. The surprise came when we cut into the middle of the loaf and it was still very tacky and wet. This loaf needed to bake probably 10-15 more minutes
Ceramic Bread Pan
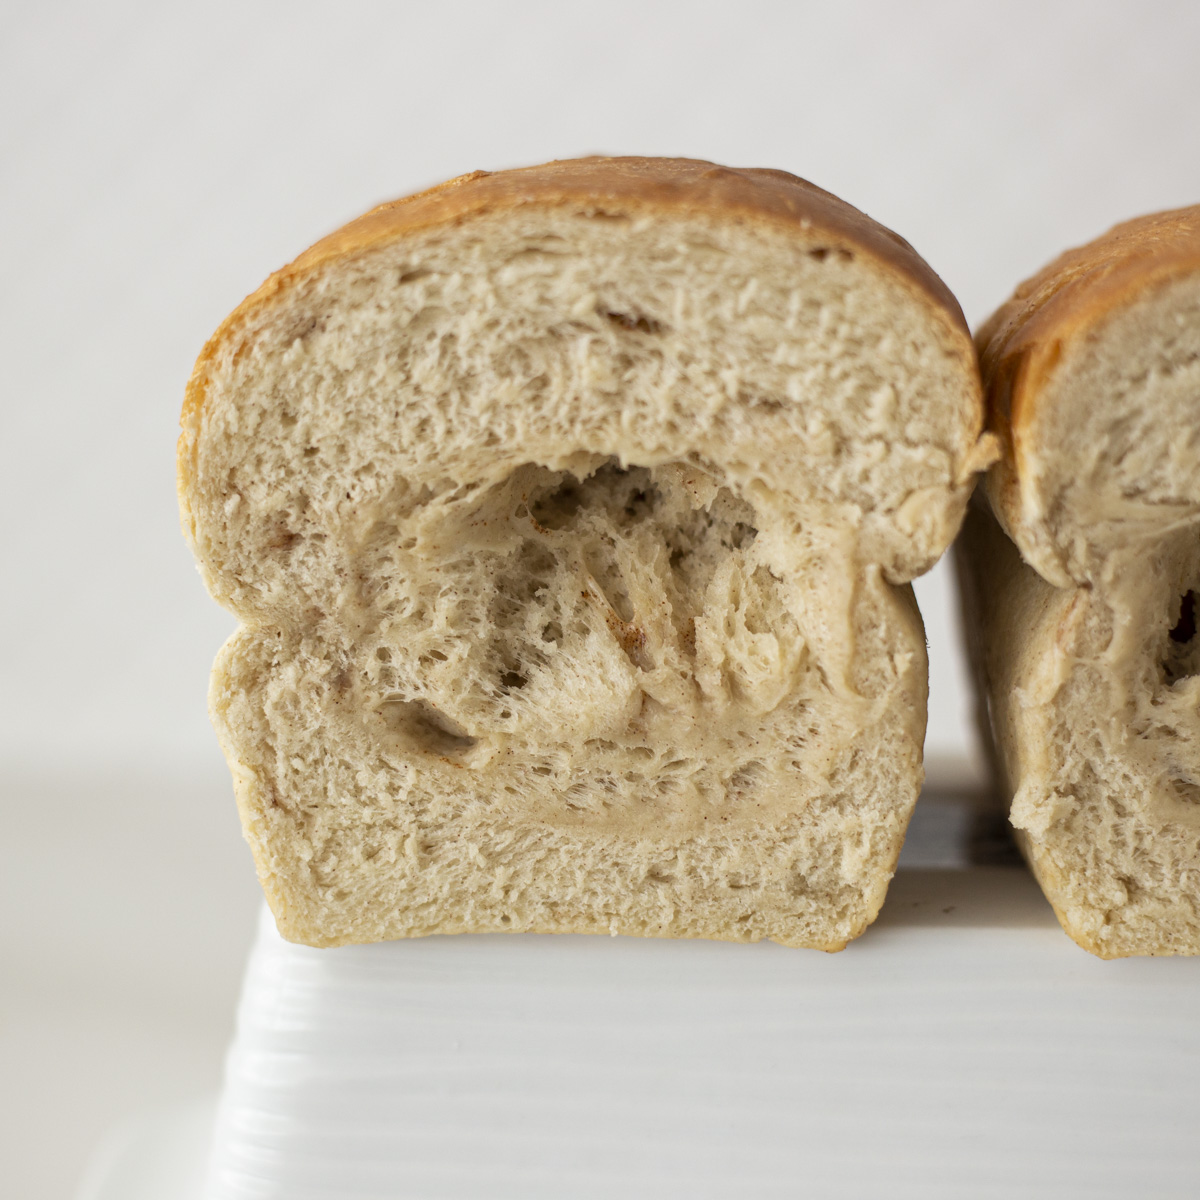
Everyone loves the look of a beautiful, classic bead pan. In the Instagram poll so many people voted ceramic as their favorite. But can these really bake bread? For our test we used a traditional White Ceramic loaf pan. The dimensions are 8 ½” x 4 ½” x 2 ½” and it has a 40 oz. capacity (this is the smallest pan, by a considerable amount). During the rise, this one also puffed up really tall because of the shape of the pan, the smaller capacity, and height of the walls. When we pulled it out of the oven, the top of the loaf looked pretty good, with good color and firmness. When we pulled the loaf out of the pan, the bottom was very wet and the edges had very little coloring. Now we were seeing more of what we expected. And we weren’t shocked when we finally cut into the loaf and found the inside still had raw dough. This absolutely need a minimum of 15 minutes additional bake time, probably longer.
The Results
When the breads first came out of the oven they all looked so good! It had us second guessing all we thought we knew. The tops were round, firm, and golden brown. We suddenly believed we were going to magically have three perfectly baked loaves of bread and were prepared to be shocked. But alas, it was not so. Once we let them cool and started removing them from the pan, a different story began to unfold. We could easily see the differences in each loaf. And cutting into them we could tell that each one was still a little bit underdone. According to this test, and as far as the controls would allow, the best pan for our white bread was the Fat Daddios anodized aluminum. But it wasn’t perfect yet!
That said, this does not eliminate all other pans as contenders. We decided to do a follow-up test, examining all six different bread pan materials. We baked up both a sandwich bread and a sweet quick banana bread. And instead of cooking to a specific time, we cooked each one to the correct internal temperature. For yeast bread, we recommend you cook to 185-190℉ and for quick breads, like banana breads, you want a higher temperature of 200-205℉. We thought we would do a deep dive on each material and nit-pick all the differences in each loaf. Do you want to know what we found? Each loaf pan totally worked! We just had to watch the oven and adjust the cook times, sometimes by a lot (for the banana bread in the ceramic pan it took almost 40 extra minutes). And we did have to cover a couple of the loaves with foil so the tops didn’t brown too much. But in the end, they all came out just fine.
So whatever bread pans you have in your cupboard you can still make amazing bread from home. But if you are looking to up your game and get something a little more reliable that requires less finesse and finkicing and tinfoil to keep the top from burning, we recommend Fat Daddios or USA loaf pans. They had the fastest cook times, the fastest cool downs, and the best overall, even bake throughout.
Mindy
October 6, 2022 at 11:05 amI love this baking comparison. Thanks for providing such helpful information. Do you have an ideal internal temperature you would recommend for quick and yeast breads?
london
October 6, 2022 at 12:43 pmFor yeast bread, we found out that you cook to 185-190℉ and for quick breads, like banana breads, you want a higher temperature of 200-205℉. (I just edited the blog to include these temps too). Hope this helps!