This is one of the easiest and tastiest chicken recipes ever. Don’t be alarmed by the recipe, or the fact that there is just 3 simple ingredients. This chicken recipe impresses all!

One of our foodie friends Dorian shared with us “THE BEST CHICKEN YOU’LL EVER HAVE”. With a statement like this, I knew we had to try it, and try it quick! This recipe steers you away from the normal chicken breast and gets you using the SKIN ON CHICKEN THIGH. We haven’t noticed a huge difference in the flavor or cook time if you have bone in or not, so if you find either option grab that, but make sure it for sure is SKIN ON. You will thank us later.

The recipe is simple. The directions are precise. The end result is amazing. But you have to promise you will follow it exactly for perfect results. Dorian says “Don’t try to get cute with it, keep it simple, and you will taste chicken the way it is supposed to taste!” So that’s what we did, I fought the urge to add some pepper, or some Chef Todd’s Pit Seasoning- I wanted to make sure to try it the way it was designed-before adding my own flair. And I am glad we did.
To start out you really just need three simple ingredients. Skin on chicken thighs. White distilled vinegar. Regular table salt. That’s it.
We don’t have an exact recipe for you, as you customize it to how many people you are feeding. We have found most adults will eat 2-3 thighs and kids usually about 1. Once you have determined how many pieces to buy, you will need enough vinegar to completely cover the chicken thighs in a pot, pan, or gallon ziplock bag. Dorian has been able to use the vinegar/salt solution 2-3 times in one day so if you are planning on feeding a large crowd you don’t need to have a brine solution for each batch but after 3 batches you will probably want to start fresh again- as the chicken will absorb a lot of the salt. We fed 30 people and used 1 gallon of white distilled vinegar and 26 oz of salt. But make sure you are using enough vinegar to completely cover the chicken.
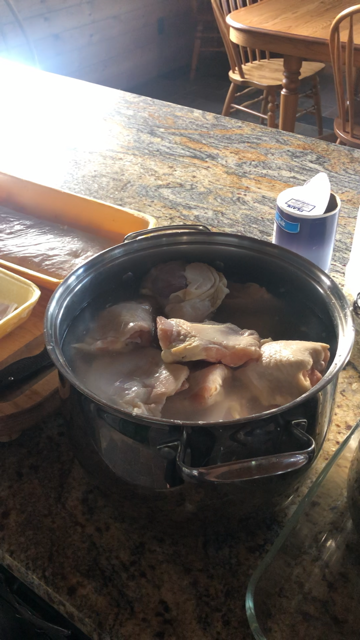
Once you figure out how much vinegar you are using you now add in the salt, this also varies but the best way to know you have enough is keep adding the salt into the vinegar until the vinegar can no longer dissolve the salt. We used a lot more than I would have guessed but just keep adding until after you stir it for a bit, you can still feel the salt on the bottom. Once you have reached that point, its time to add your chicken.
Together your salt and vinegar will create a sort of brine that finds it’s salty way into the whole chicken thigh, without adding too much salt or tang from the vinegar. The secret really is the time. Set your timer for 7 min 30 sec. If you leave your chicken in the brine solution for too long-all you will taste is the salt- and we still like to taste the chicken after all, so don’t walk away. Don’t set your timer for 9, or 6. Set it for 7:30 and start taking them out. Promise us right now, you will watch the time!

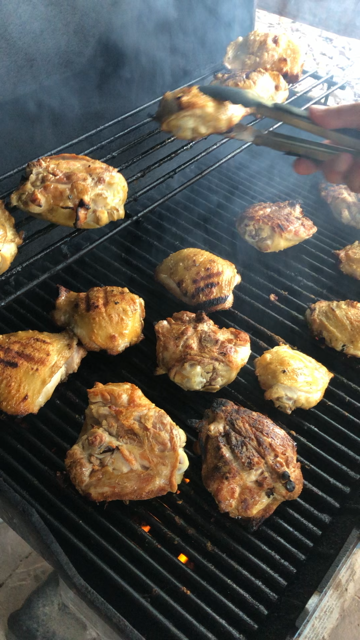
Once the timer goes off, place the chicken on a cooling rack inside a cookie sheet, or somewhere to slightly drain, then place them on the grill. If you are cooking them in the oven, let them drain a little bit so the salt brine solution drips a little and dab with a paper towel. The are cooked on the grill medium-heat for about an hour, Traeger Grill 325 degrees for one hour. Watch them closely on a gas grill, and turn frequently. The Traeger doesn’t require as much watching so you can leave that one alone for a bit. But just cook until internal temperature reaches 165. If cooking on the grill, the outside skin will get nice and crispy-this is a favorite part of ours- so watch for that. If you are on the Traeger, we have noticed the best way to get the crispy outside is to then bring it inside and put it in the oven under the broiler for 2-3 minutes.
That’s it! It’s kind of crazy, very precise, but one of the best chicken recipes we really have ever tried. We highly recommend it for large groups- the guys in your life will thank you for trying something other than a chicken breast, and your wallet will thank you too-chicken thighs are very inexpensive but sooo delicious. Enjoy!


8 Comments
Suzanne H Ivie
August 9, 2019 at 8:05 amCan you use chicken breasts with out the skin? Would this “brine” work for that?
Pam
August 9, 2019 at 8:40 amI live in a condo- no grilling allowed can these be fixed in the oven and if so temperature and cooking time?
Thanks
Vicky
August 9, 2019 at 6:19 pmWhat did I do wrong?
Medium heat on the grill, and I checked it after 45 minutes and it was burned.
Ate the good parts but it didn’t seem much different. . .
Oh, how I wanted it to be fantastic, like you said?
candaceheward
August 17, 2019 at 9:42 pmShoot! I have noticed that sometime my grill will flare up, due to the amount of juices dripping off the chicken. These flare ups can cause burning. I wonder if this happened for your chicken! Turning the heat down seems to help prevent this from happening. But the best method is to put them on the smoker, where they are not over a direct flame. Either way, I am sorry your chicken did not turn out absolutely delicious! We love this method.
Emily Allen
August 25, 2019 at 8:22 amHow far ahead can you make the “marinade”? We tried this yesterday and it was FANTASTIC – moist, flavorful, everyone loved it. We grilled it, with a few burners off and it was perfect.
Robyn Knab
September 3, 2019 at 1:12 pmHi Heather with Gygi. I enjoyed your segment on Studio 5 Tuesday, September 3, 2019 and wonder if I could bake the three-ingredient chicken recipe in a 325 degree oven for one hour and get the same result or must it be on a barbecue grill? Looking forward to your reply and trying your recipe. Best regards, Robyn Knab 801.592.1553
candaceheward
September 25, 2019 at 11:27 pmYes! You can definitely cook the chicken in the oven. Just place it on a roasting rack over a sheet pan to collect all the juices. I’d just use a meat thermometer to ensure it has finished cooking. It is likely to be done after an hour, but you can make sure by checking the temperature. Once the meat has reached 165 degrees. you are good to go!
Howgeekis.Com
May 8, 2020 at 5:39 pmI’m not a souvenir kind of person–so I brought things like chocolate, gummi candy and cheese home from my trip. For this recipe I used an aged Dutch gouda–but any delicious melty cheese would be good (emmentaler is recommend in many other online recipes). I went looking for recipes and most had you make the noodles and then just layer it with cheese and bake it. I know the one I ate in Munich was more than just cheese–it had more creaminess than that. I did find a few references in some recipes that added cream and butter as well as cheese. I improvised a bit and made a bit of a roux that would help stablize the cheese sauce during the oven baking time.